1. Introduction
Accessibility is a central aspect in the design of modern kiosk and digital signage solutions. With SiteKiosk Online, you can design your projects according to the requirements of the EU Accessibility Act (EAA) and the U.S. accessibility guidelines (ADA), making access easier for users with visual, motor, or cognitive impairments. SiteKiosk Online offers specialized features to make public terminals more accessible.
Kiosk terminals are often public points of interaction—whether in municipal offices, HR departments, museums, or retail environments. An accessible user interface is therefore not only legally relevant but also broadens your target audience and enhances overall usability. SiteKiosk Online provides a dedicated, integrated accessibility menu that includes a kiosk-optimized SiteKiosk screen reader, screen magnification, color adjustments, brightness and volume controls.
In addition, external devices such as accessible keypads from Storm Interface can be connected. Alternatively, your project can be remotely controlled via smartphone using Smart Kiosk Control, which is helpful when the screen is not directly reachable for certain user groups. This How-To is based on SiteKiosk Online version 1.8. We recommend always using the latest version of the software to benefit from all available features. If you already have existing projects, you can now make them accessible as well. If you have any questions, feel free to contact us!
2. Requirements and Setup
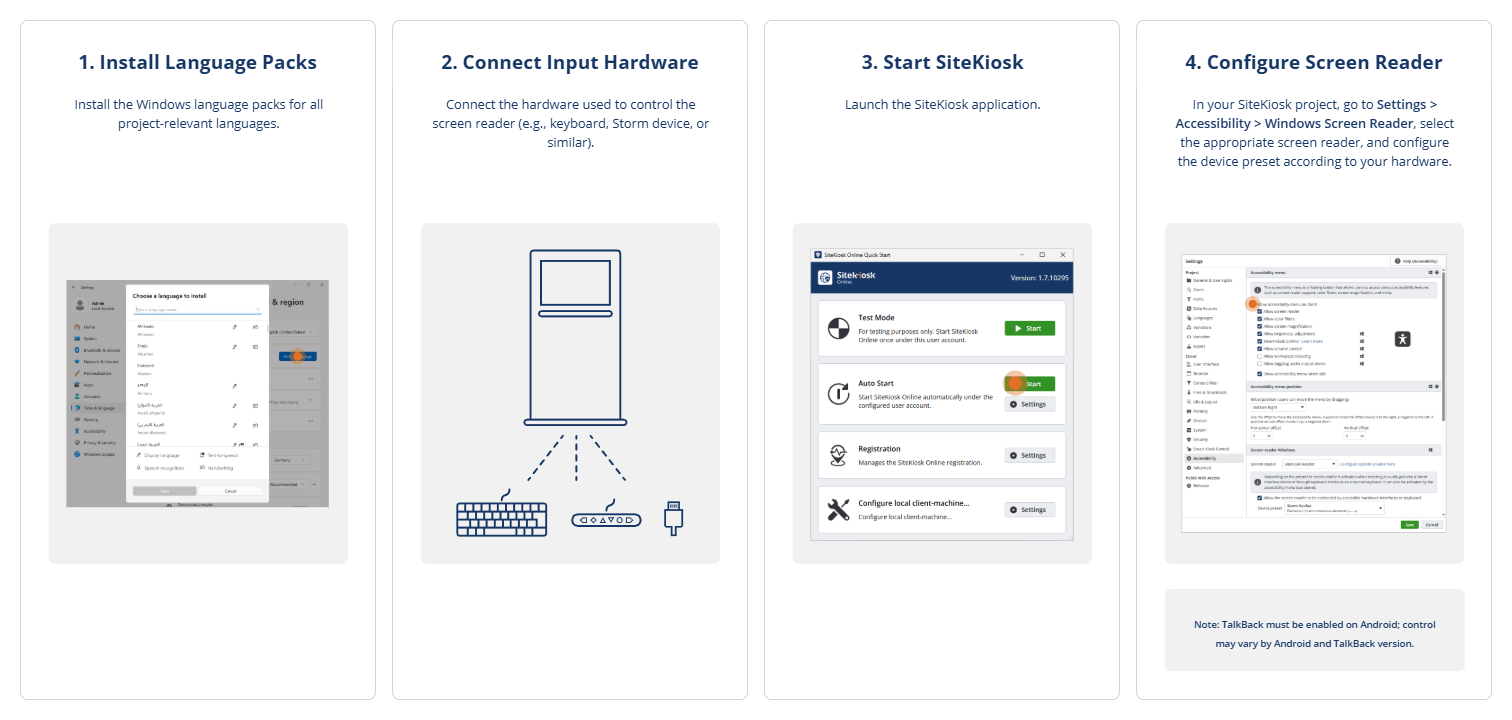
Before activating the accessibility features, please ensure the following:
-
All external devices (e.g., Storm Interface, audio pads, special keypads) must be connected before SiteKiosk starts.
- Optimized external accessibility devices are recommended; a regular keyboard is not ideal and often causes more confusion than it helps. Easy-to-use devices such as Storm Interface’s NavPad offer intuitive operation.
- Make sure you are using a current SiteKiosk Online version (available from version 1.7).
- For Windows, you can use the integrated SiteKiosk Reader or an external screen reader such as NVDA, JAWS, or Windows Narrator.
- On Android, TalkBack is supported.
3. Focus Order in Interfaces Created in the Editor
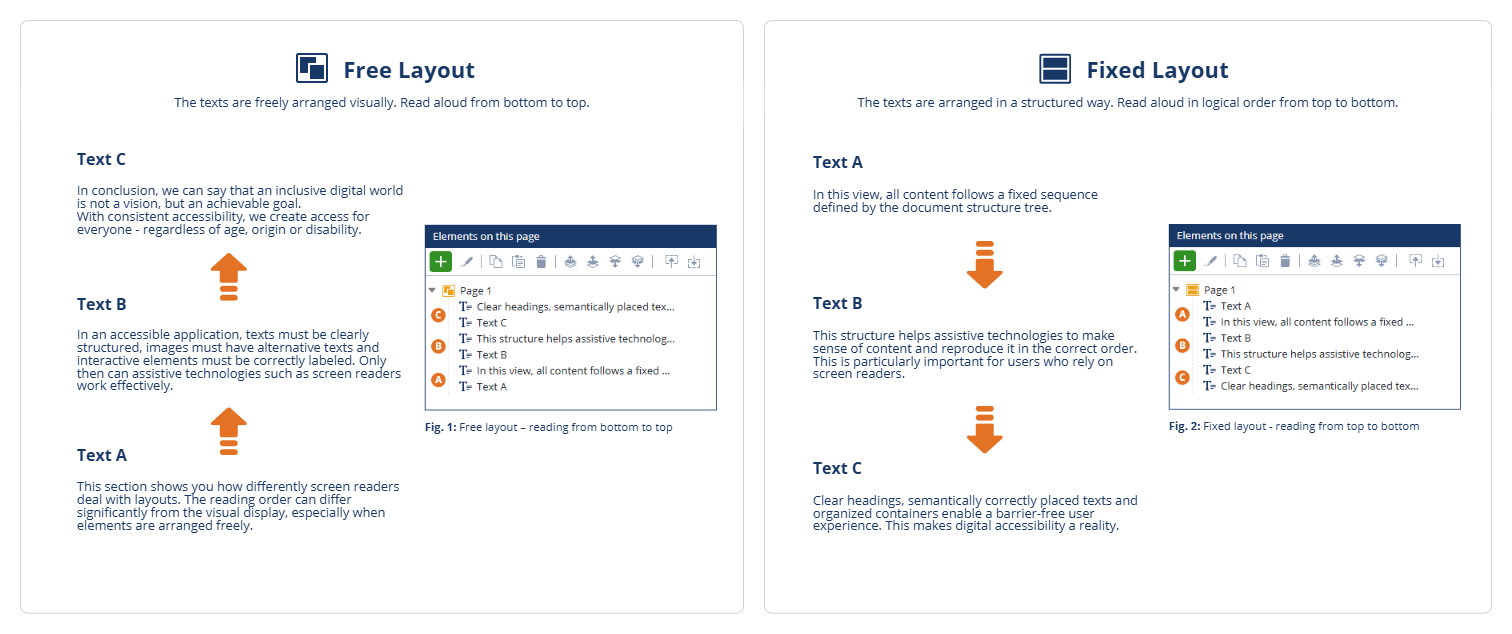
The order in which users navigate an interface created in the SiteKiosk Editor (e.g., home screens, menu structures, or custom templates) using a keyboard or screen reader depends on the layout type selected in the editor. It is important to note: This is not about the visual position of the elements on the screen, but about their order in the editor’s Treeview.
Free Layout:
In free layouts, elements in the Treeview are read from bottom to top. This means elements that should be focused or read first must be placed lower in the Treeview.
Fixed Layout:
In fixed layouts, elements in the Treeview are read and navigated from top to bottom. This means elements that should be focused or read first must be placed higher in the Treeview.
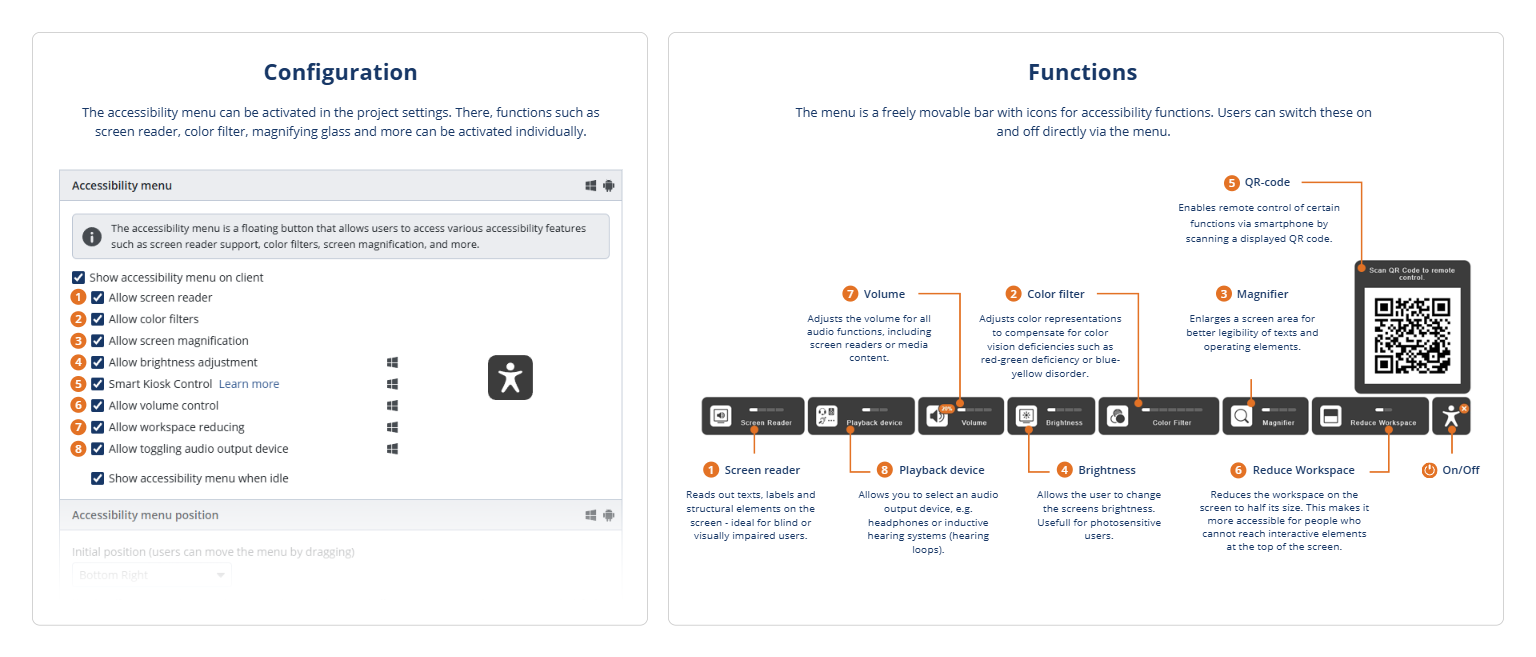
4. Activating the Accessibility Menu
- Open your project in the SiteKiosk Online Editor.
- In the settings menu, select “Accessibility”.
- Enable the option “Show accessibility menu on the client”.
- Define which functions should be available, such as:
- Allow screen reader
- Allow screen magnification
- Allow color adjustments
- Allow brightness or volume control
- Optional: Enable “Show accessibility menu also during inactivity” to keep the icon permanently visible.
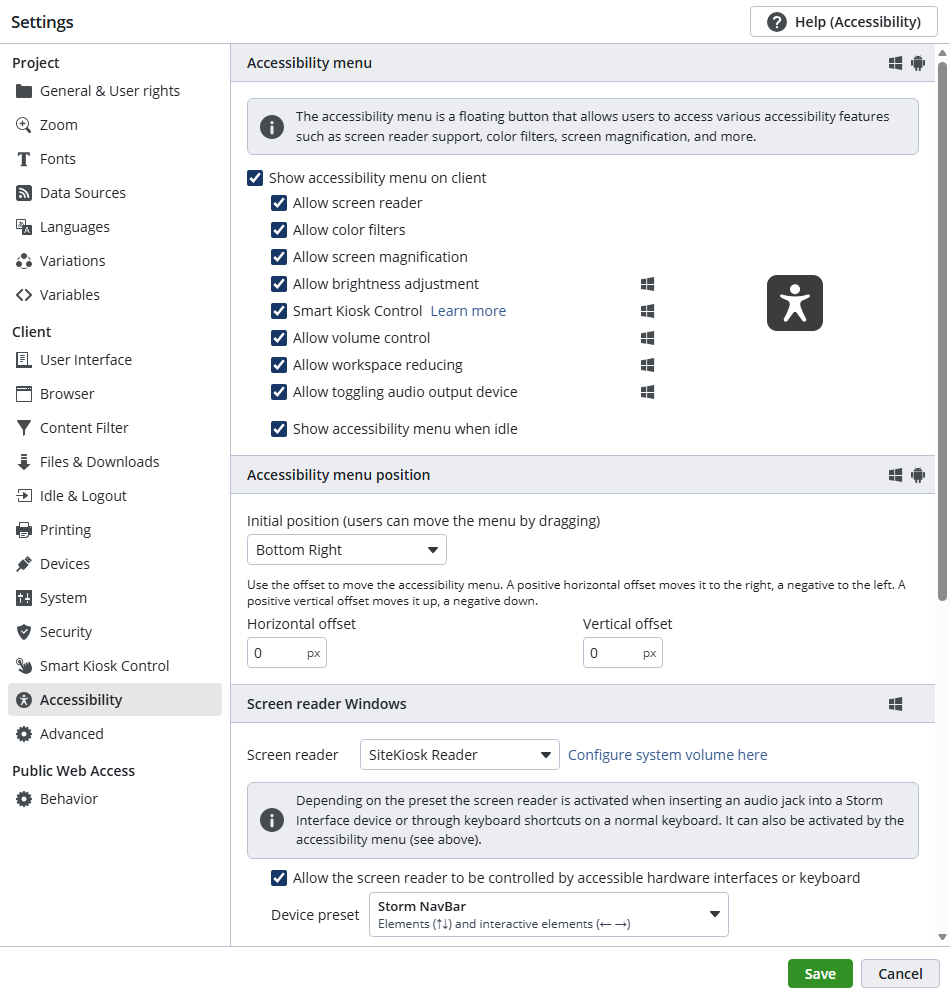
The menu will then appear as a floating icon on the client. Users can open it via mouse, touch, or keyboard and activate the desired accessibility features.
Note: The default position (e.g., bottom right) can be adjusted using the horizontal and vertical offset settings.
5. Screen Reader on Windows
- Under “Windows Screen Reader,” select the desired screen reader:
- SiteKiosk Reader (integrated)
- NVDA, JAWS, or Windows Narrator (external) – These external options require separate configuration and adjustments within the respective screen reader software. In most cases, the SiteKiosk Reader is recommended, as it is optimized for use on public terminals.
- Click “Configure system volume here” to test the speech output.
- Enable the option “Screen reader can be controlled via special hardware or the keyboard,” to integrate external accessibility devices such as Storm Interface hardware.
- You can define what the device buttons should trigger. By default:
- Up / Down navigates through all elements
- Left / Right navigates between interactive elements

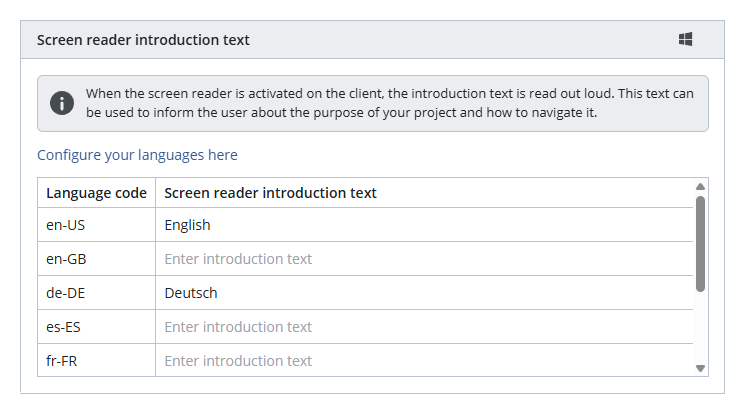
6. Introductory Texts for the Screen Reader
To help users with disabilities understand how to use the project and to offer a language selection, you can define an introductory text for each language:
- Scroll to the section “Screen Reader Introductory Text”.
- Enter the desired text for each active language.
- This text will be read automatically as soon as the screen reader is activated.
Example: “Welcome to the information kiosk. Use the arrow keys to navigate through the menus. To continue in German, press Enter.”
7. Accessible Content in the Editor
- Alt text for images: In the SiteKiosk Online Editor, you can assign alt text to every image. This text will be read aloud by the screen reader and can be set in the image properties under “Image”.
- For purely decorative graphics, you can specify that they should not be read by the screen reader. This can be activated in the element properties under Accessibility.
- For all other elements, you can assign an ARIA label in the accessibility settings. This label will also be read aloud by the screen reader.
- Texts & buttons: Use clear, descriptive labels rather than generic phrases such as “Click here”.
8. Testing & Verification
- Publish the project.
- Test the accessibility menu icon.
- Check the functionality of the selected screen reader and ensure that the introductory texts are read correctly.
- Verify that all external devices are working properly.
9. Accessibility Template
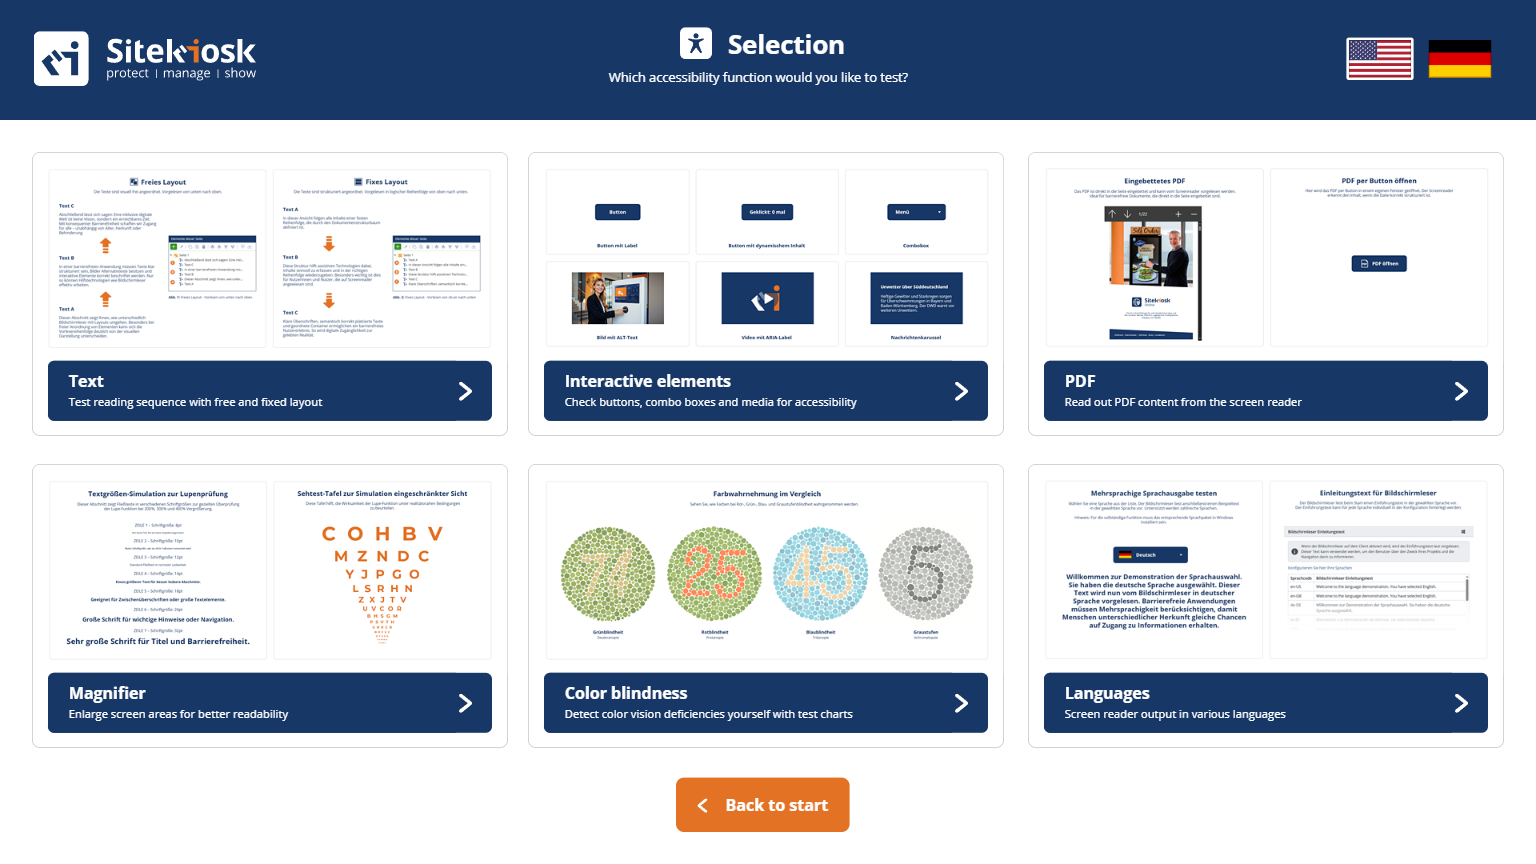
With version 1.8 of SiteKiosk Online, a comprehensive accessibility template was introduced, providing users with a complete overview of all available accessibility features.
This template serves as a central demonstration and testing environment. You can try out all accessible elements supported by SiteKiosk Online and understand how they function in practice. This includes screen reader features, interactive elements, language settings, visual adjustments, and many other accessibility options.
The template not only shows what is technically possible but also how these features behave in real-world usage. It gives you a clear, structured insight into all relevant settings and allows you to test live how accessible interaction at a kiosk terminal can be implemented with SiteKiosk Online.